 English

Vendor Registration Guide
Complete Vendor Guide: From Account Registration to Product Publication
To access all vendor features on the Matching Vietnam website, you need to register for a vendor account. The following instructions provide a complete step-by-step guide to the registration process.
I. Vendor Account Registration
Start from the homepage of matchingvietnam.com. First, click the Register button located on the website’s header bar. See the instructions in the image below
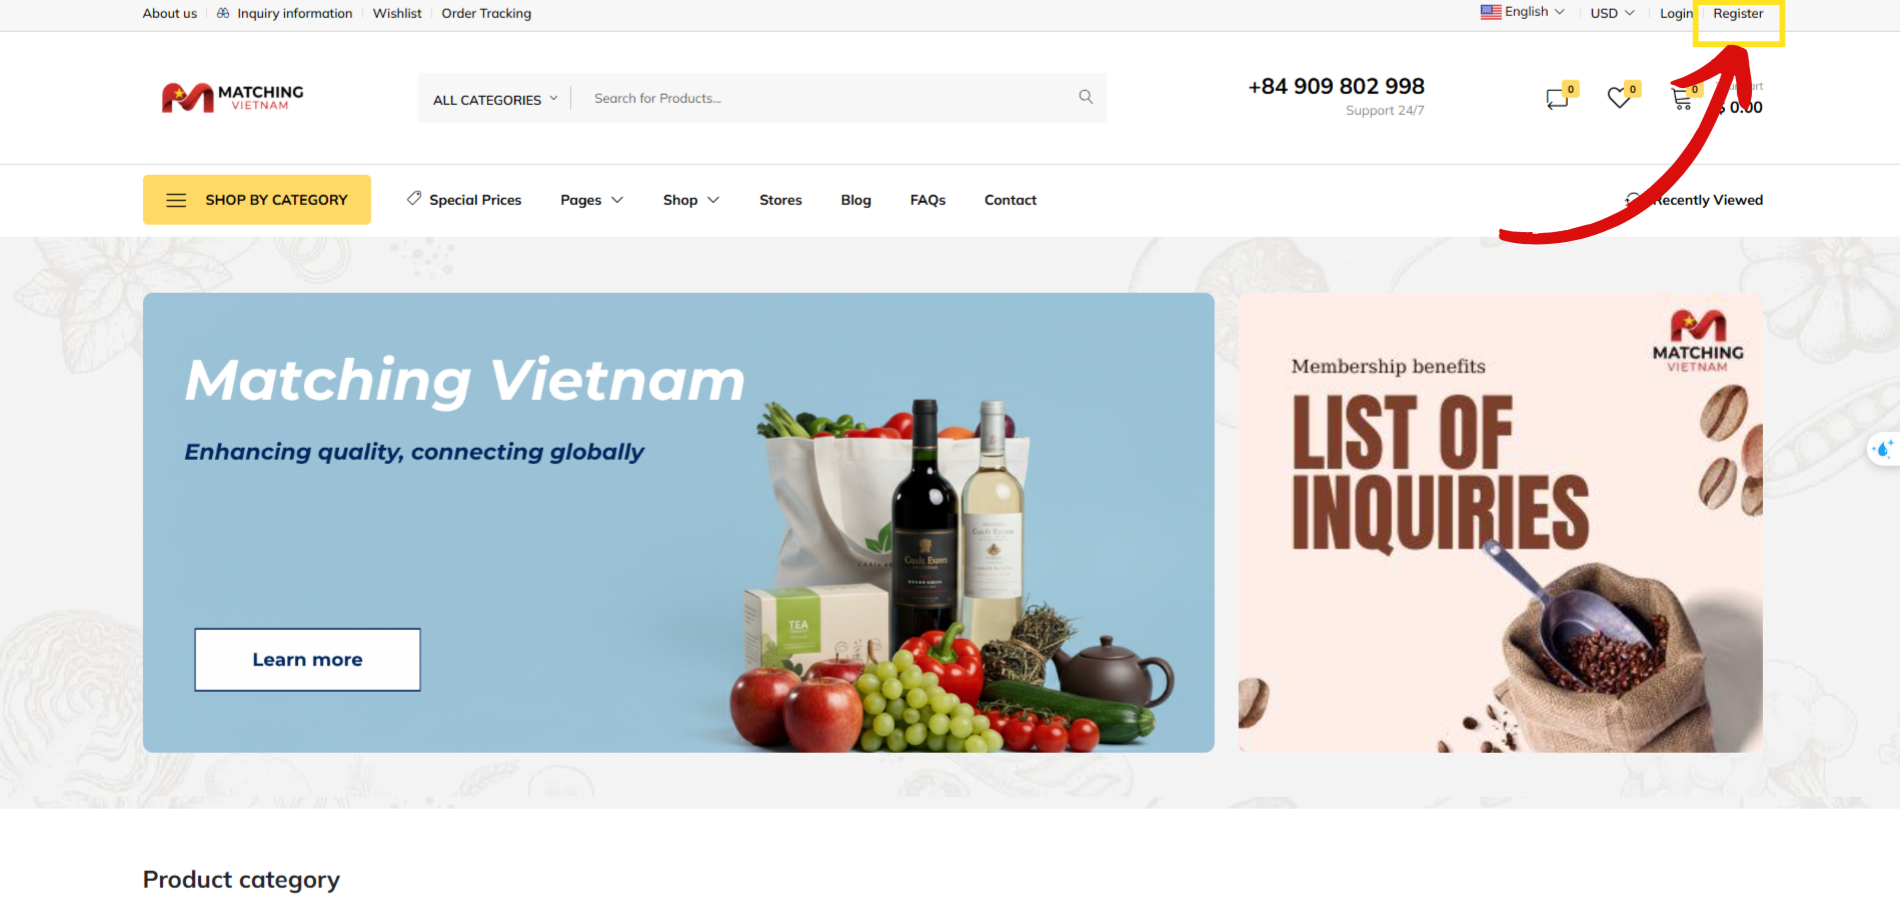
Figure 1: Home page of matchingvietnam.com
After clicking, the website will redirect you to the Account Registration interface. On this page, you need to provide the required information, including:
your full name
email address
contact number (optional)
setting a secure password for your account.
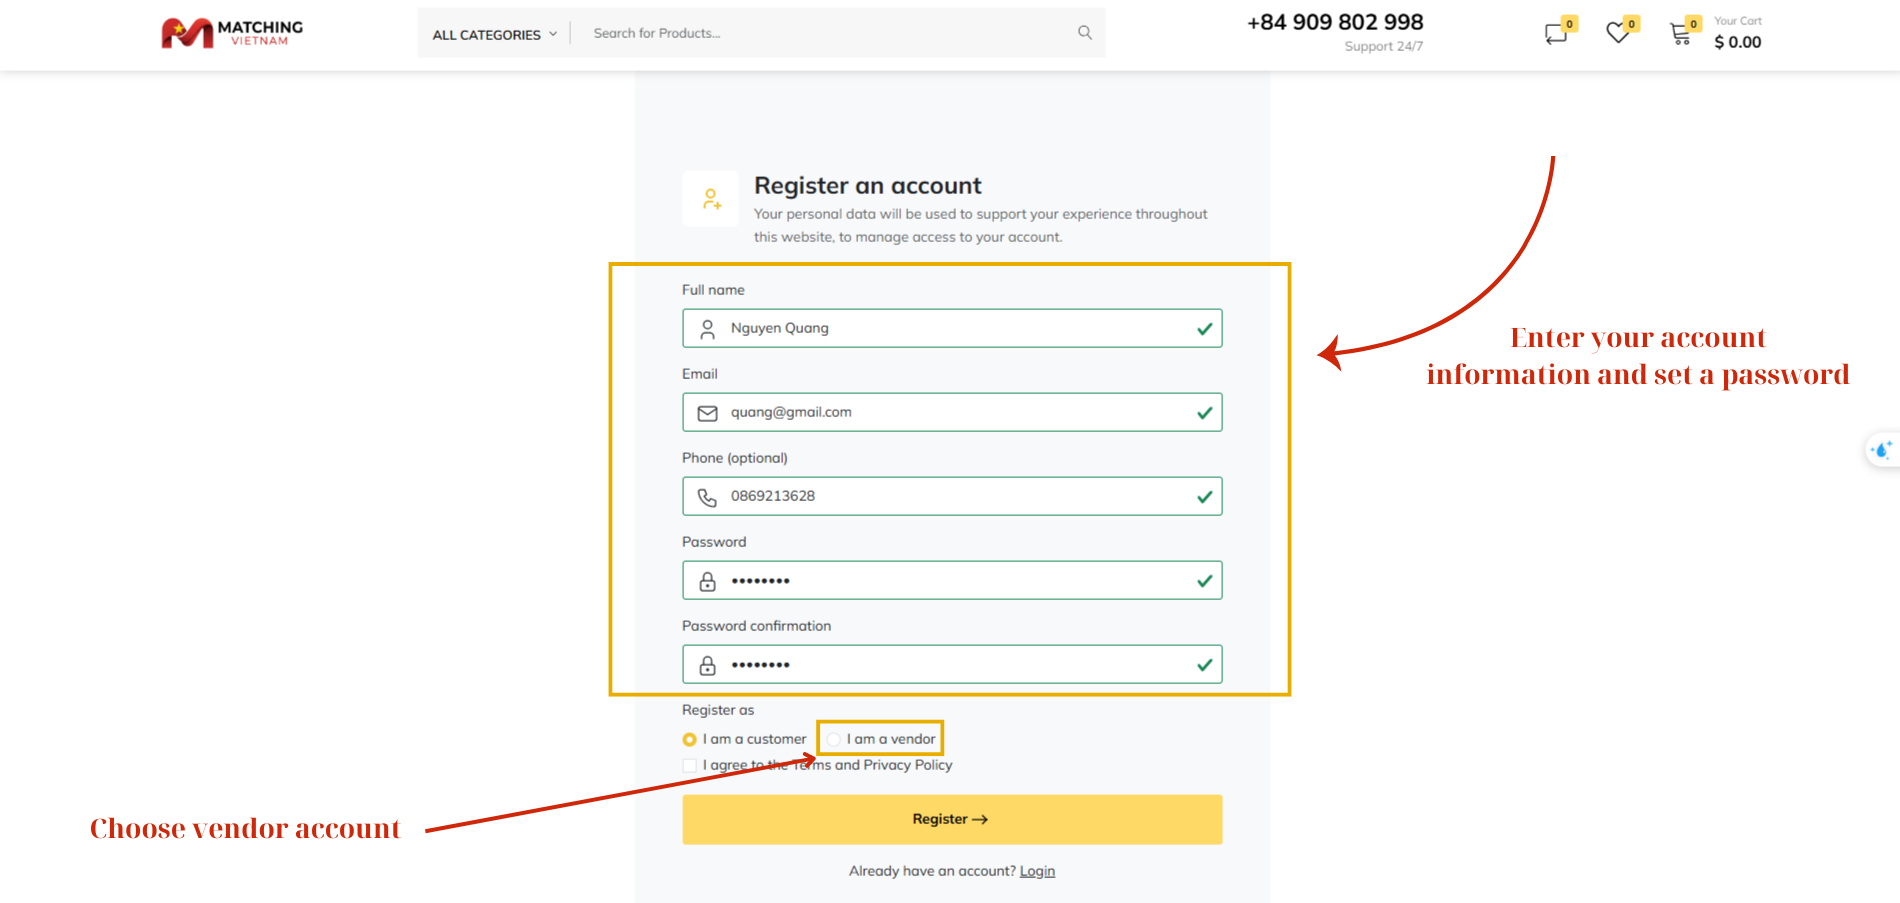
Figure 2: Enter user account information
In the next step, you can choose to register either as a customer or a vendor, depending on your intended use. In this case, please select the vendor account option.
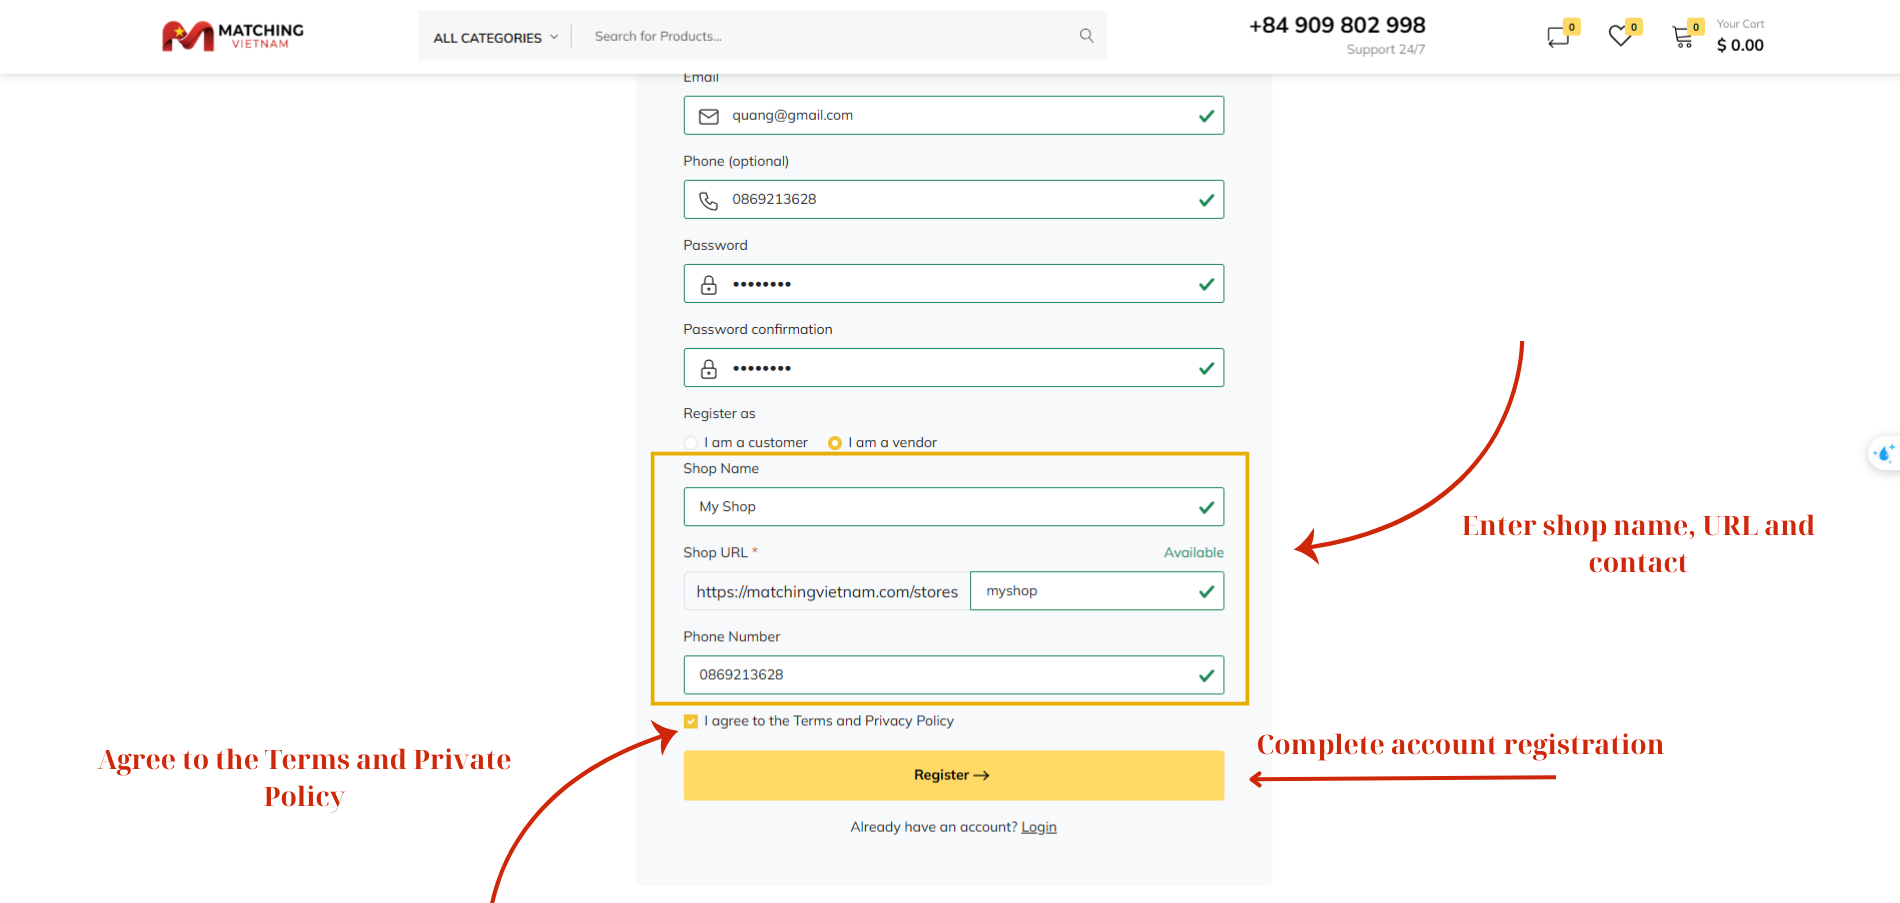
Figure 3: Choose and Enter Vendor Account Information
To register as a vendor, you are required to provide additional store information, including:
Store name - Name of your store must be unique; the website will check and warn if the entered name is duplicated
Store URL - You should include your store name in the URL
Contact details for customers
Once all mandatory fields are completed, check the box to agree to the Terms and Privacy Policy, then click Register to submit and complete your vendor account registration.
II. Vendor Authorization
After successfully registering your vendor account, you can now proceed to verify your store information and request vendor permission. This process allows you to activate your seller privileges and manage your products on the Matching Vietnam platform.
Follow the steps below to complete your vendor verification and gain full access to the Vendor Dashboard.
Step 1: Access the Account Management Section
On the homepage, click your account name in the top-right corner of the screen to open the Account Management section.
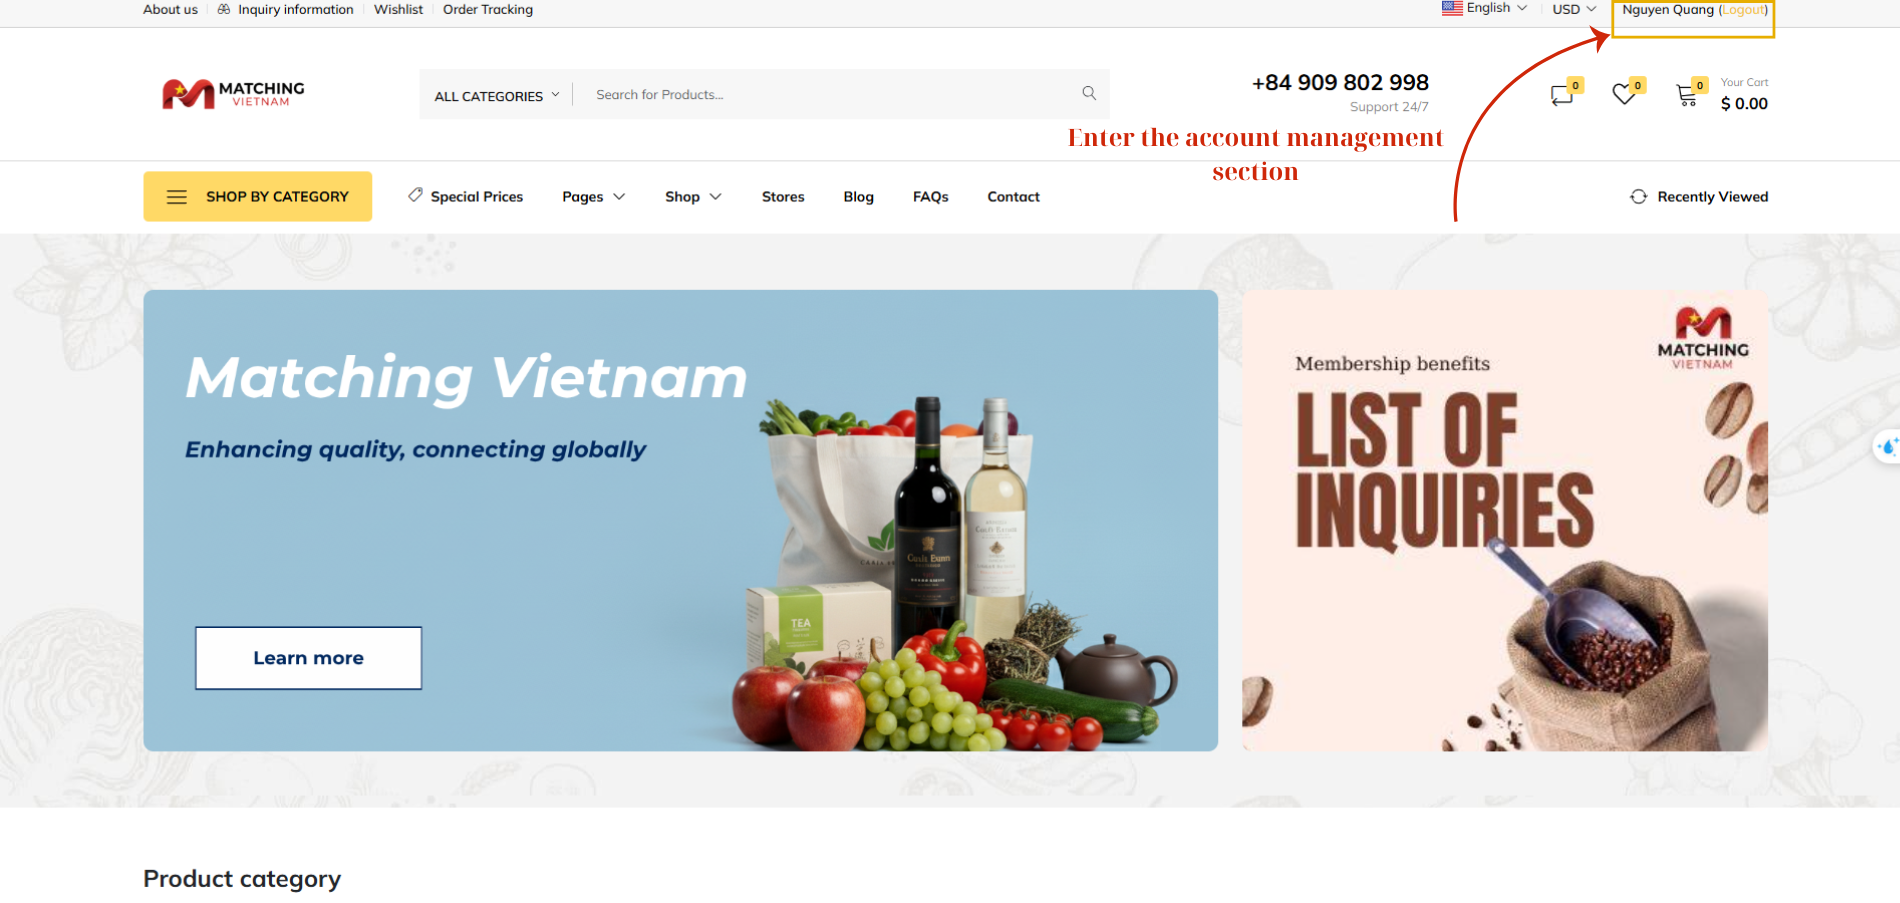
Figure 4: Back to the home page and enter the Account Management Section
Step 2: Open the Vendor Dashboard
In the Account Information interface, select Vendor Dashboard from the left-hand menu to enter the vendor management area.
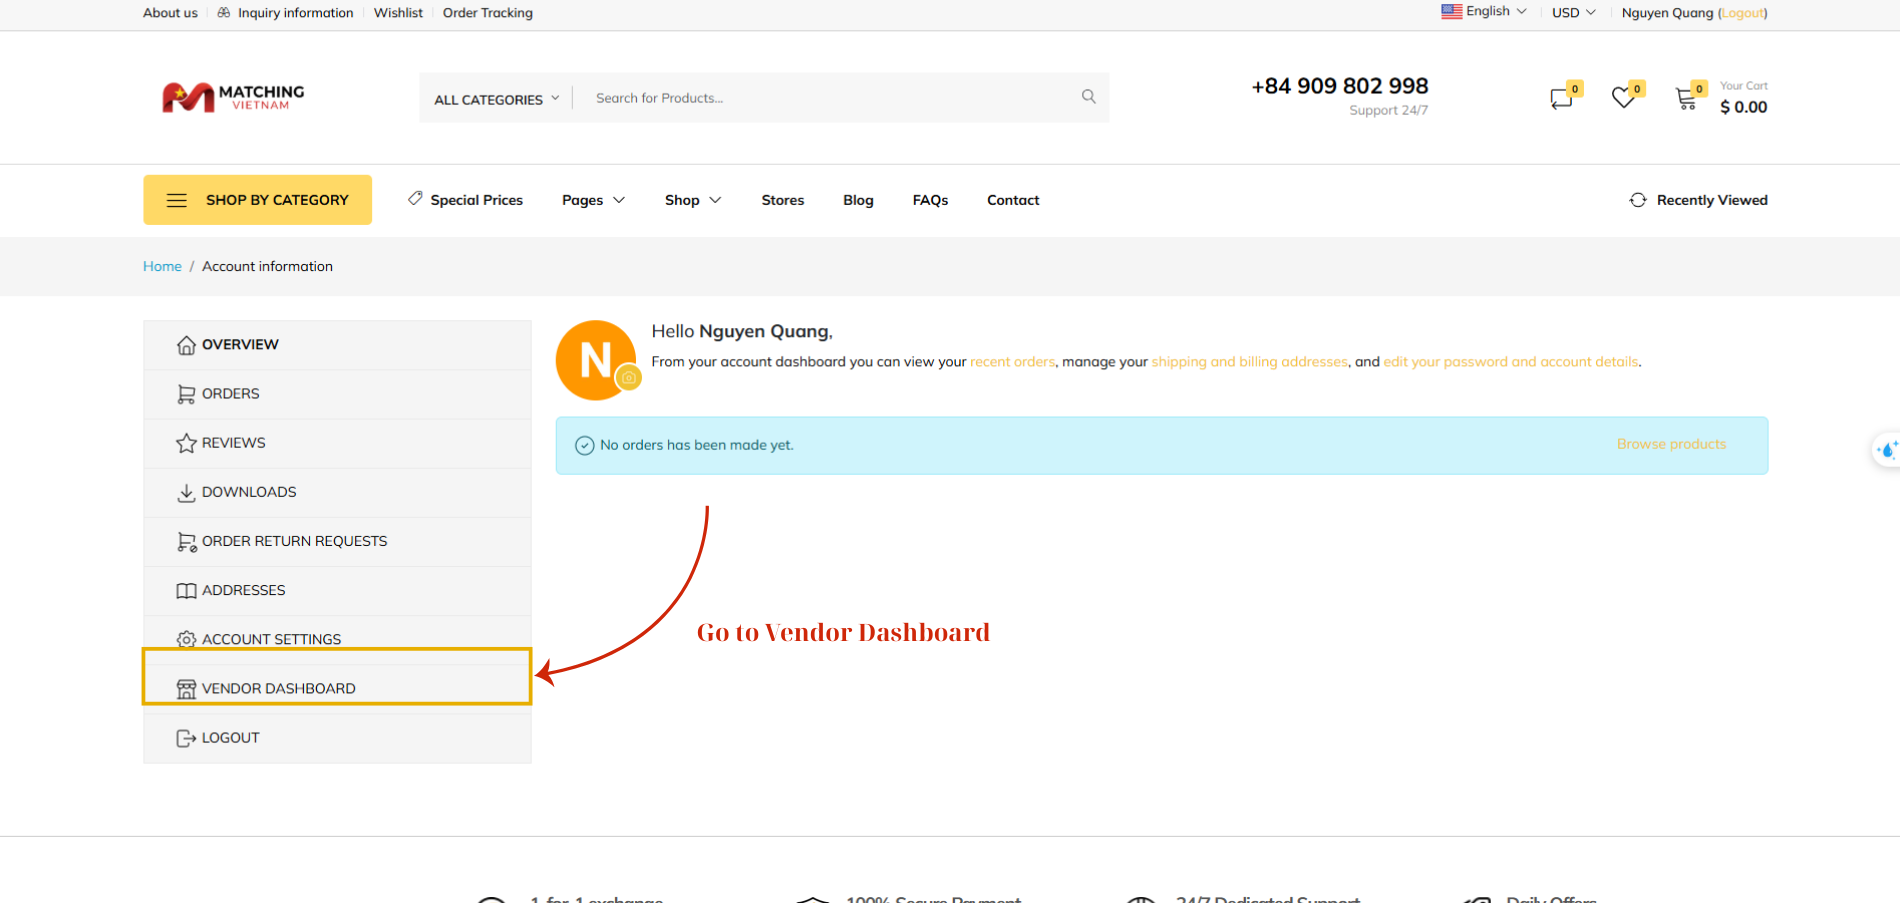
Figure 5: Enter Vendor Dashboard
Step 3: Complete the Vendor Registration Form
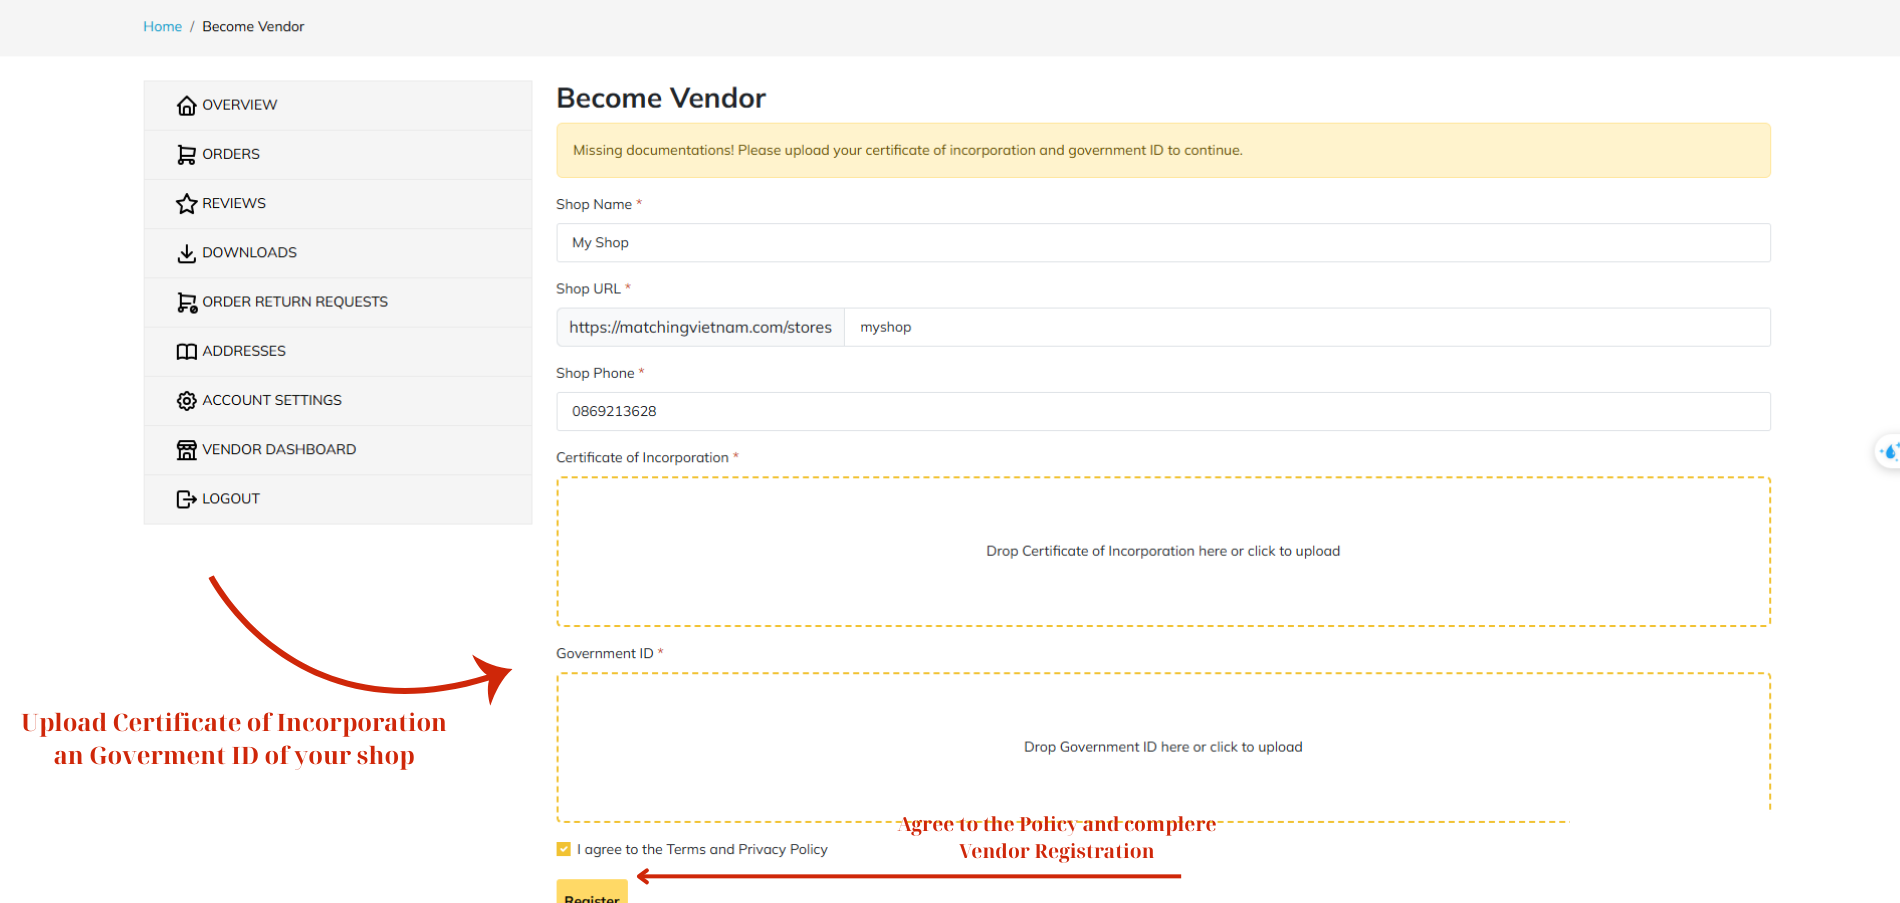
Figure 6: Upload required certificates and Request for Vendor Permission
Within the Vendor Dashboard, the system will prompt you to provide additional legal information to obtain vendor permission. You must upload the following required documents:
Certificate of Incorporation – Business registration certificate of your store or company
Government ID – Legal identification document of the shop owner or enterprise
After uploading the documents, check “I agree to the Terms and Privacy Policy”, then click Register to submit your vendor permission request.
Step 4: Wait for Administrator Approval
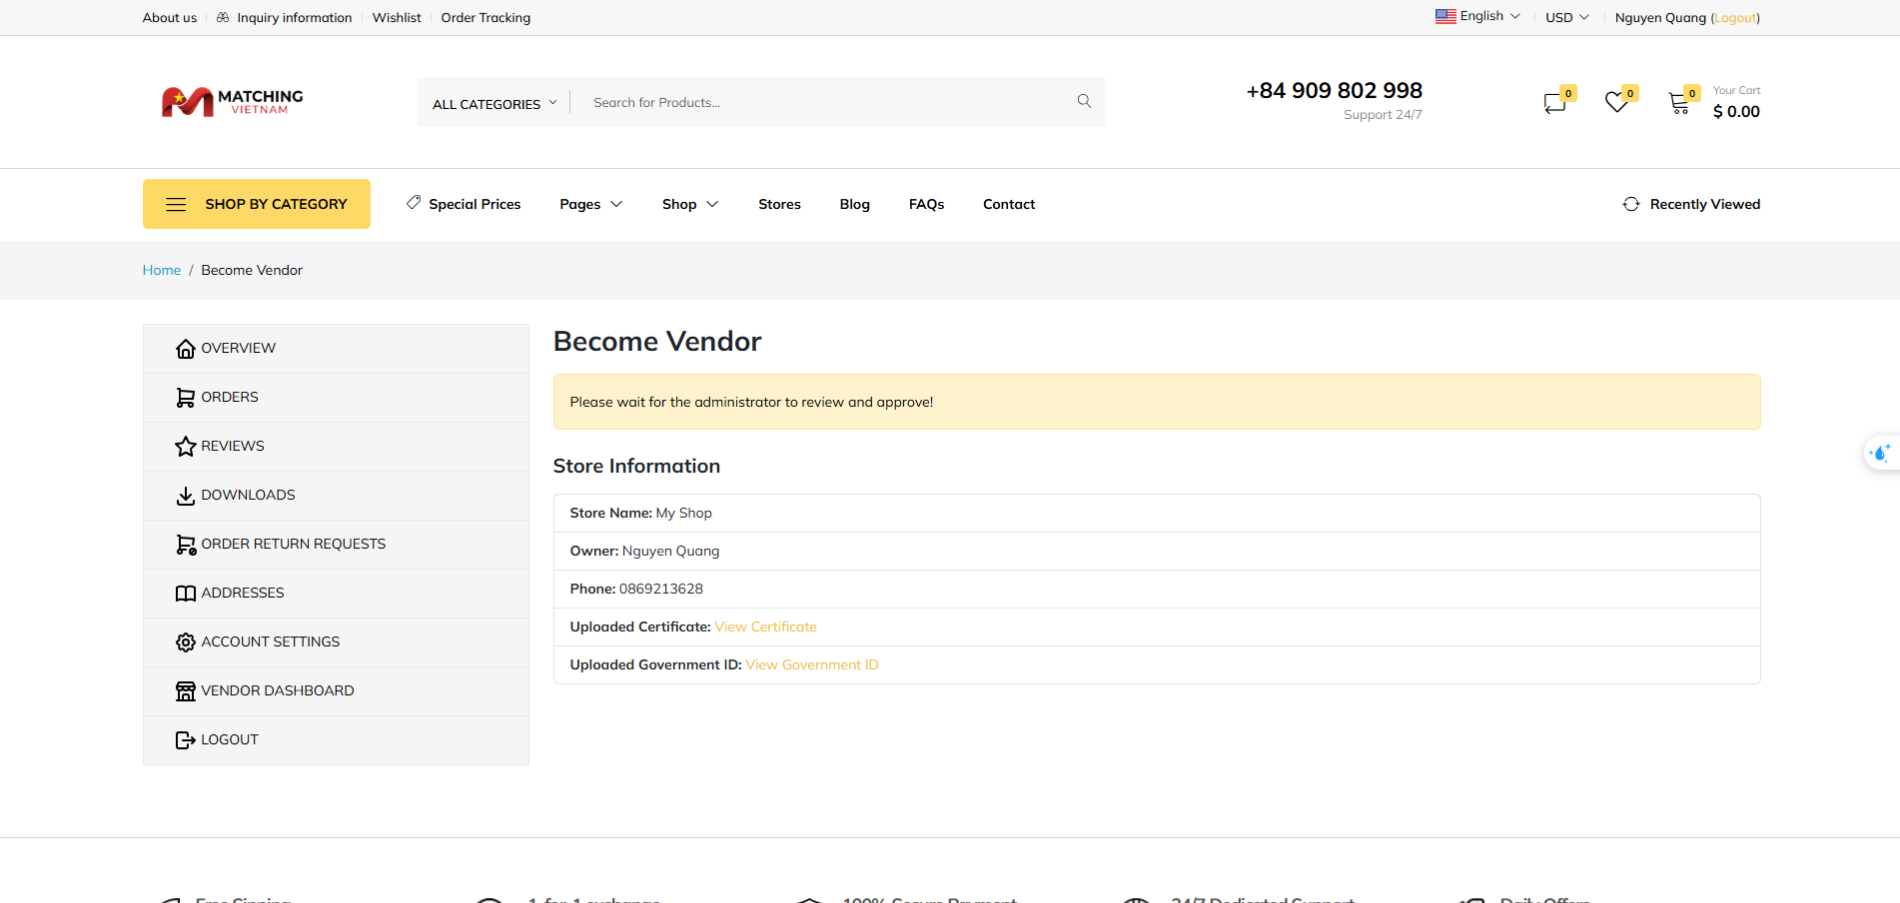
Figure 7: Wait for Review and Approve
Once your request is submitted, the system will display the message “Please wait for the administrator to review and approve.”
At this stage, you can review your store information, owner details, phone number, and uploaded documents.
III. Adding a New Product to your Store
Step 1: Access the Vendor Dashboard
Once your vendor account has been approved, you will be redirected to the Vendor Dashboard interface. From this dashboard, you can view your store’s balance, orders, and revenues, and manage your product listings.
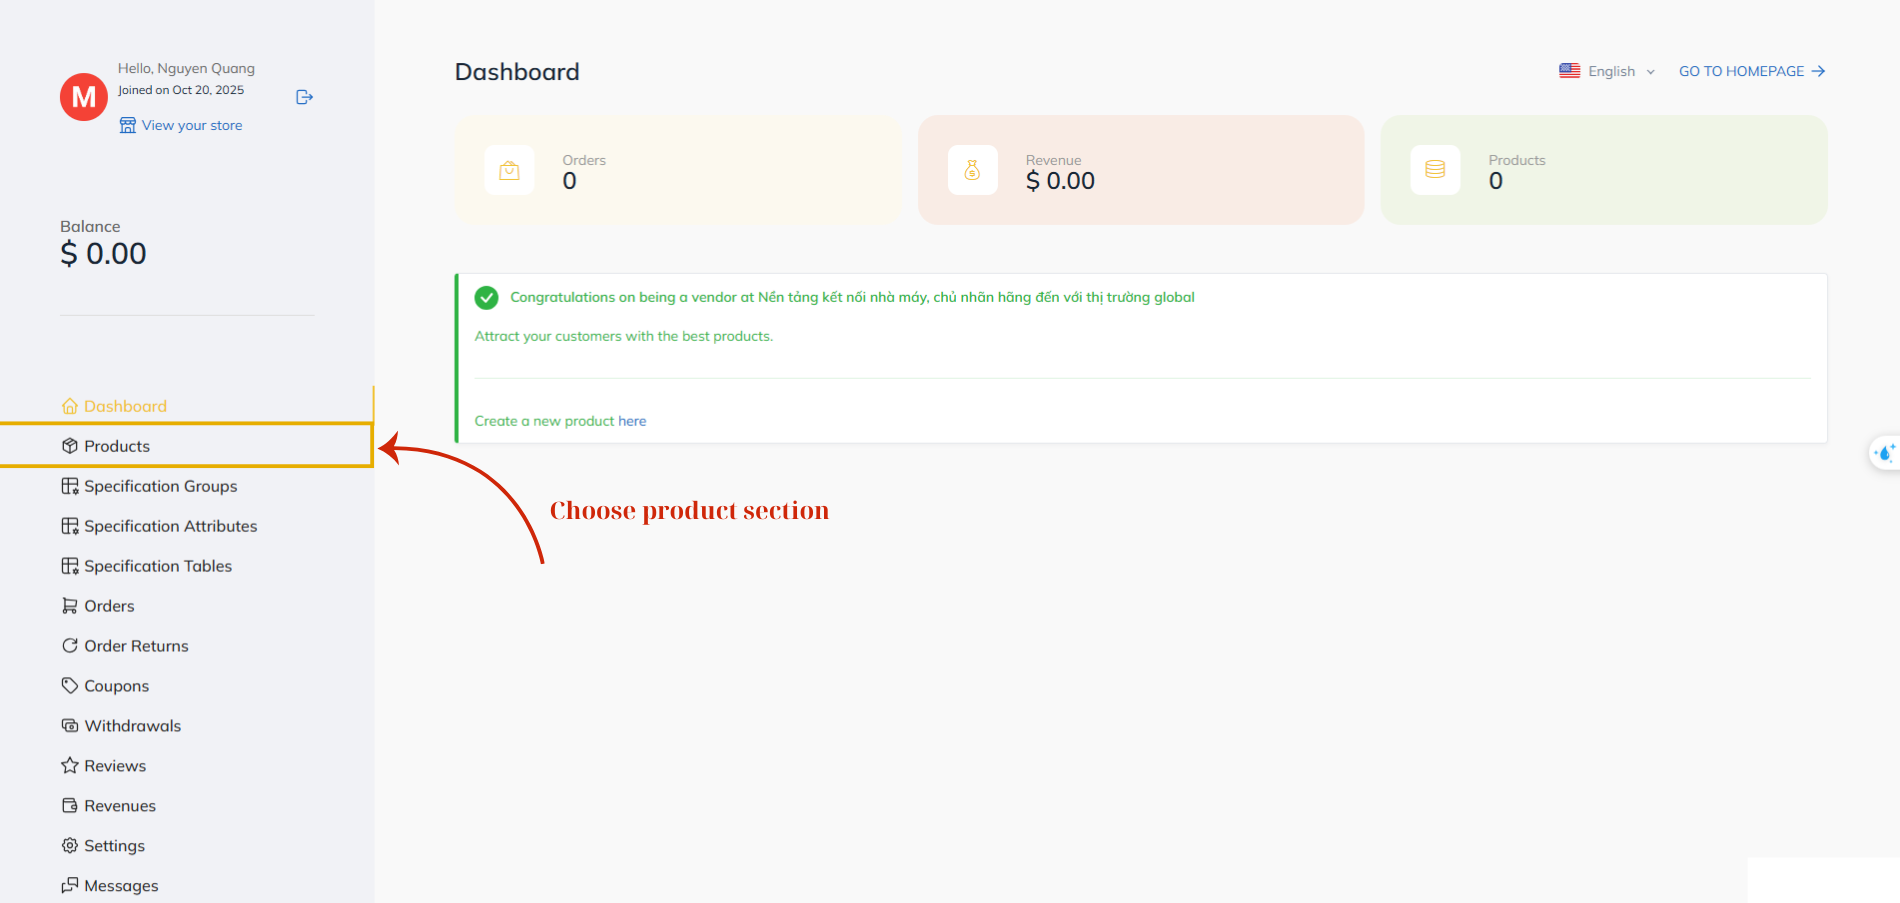
Figure 8: Vendor Dashboard
From the left-hand navigation menu, select Products to access the product management section.
Step 2: Open the Product Section
Click the Create button at the top right corner and choose Physical to add a new physical product to your store.
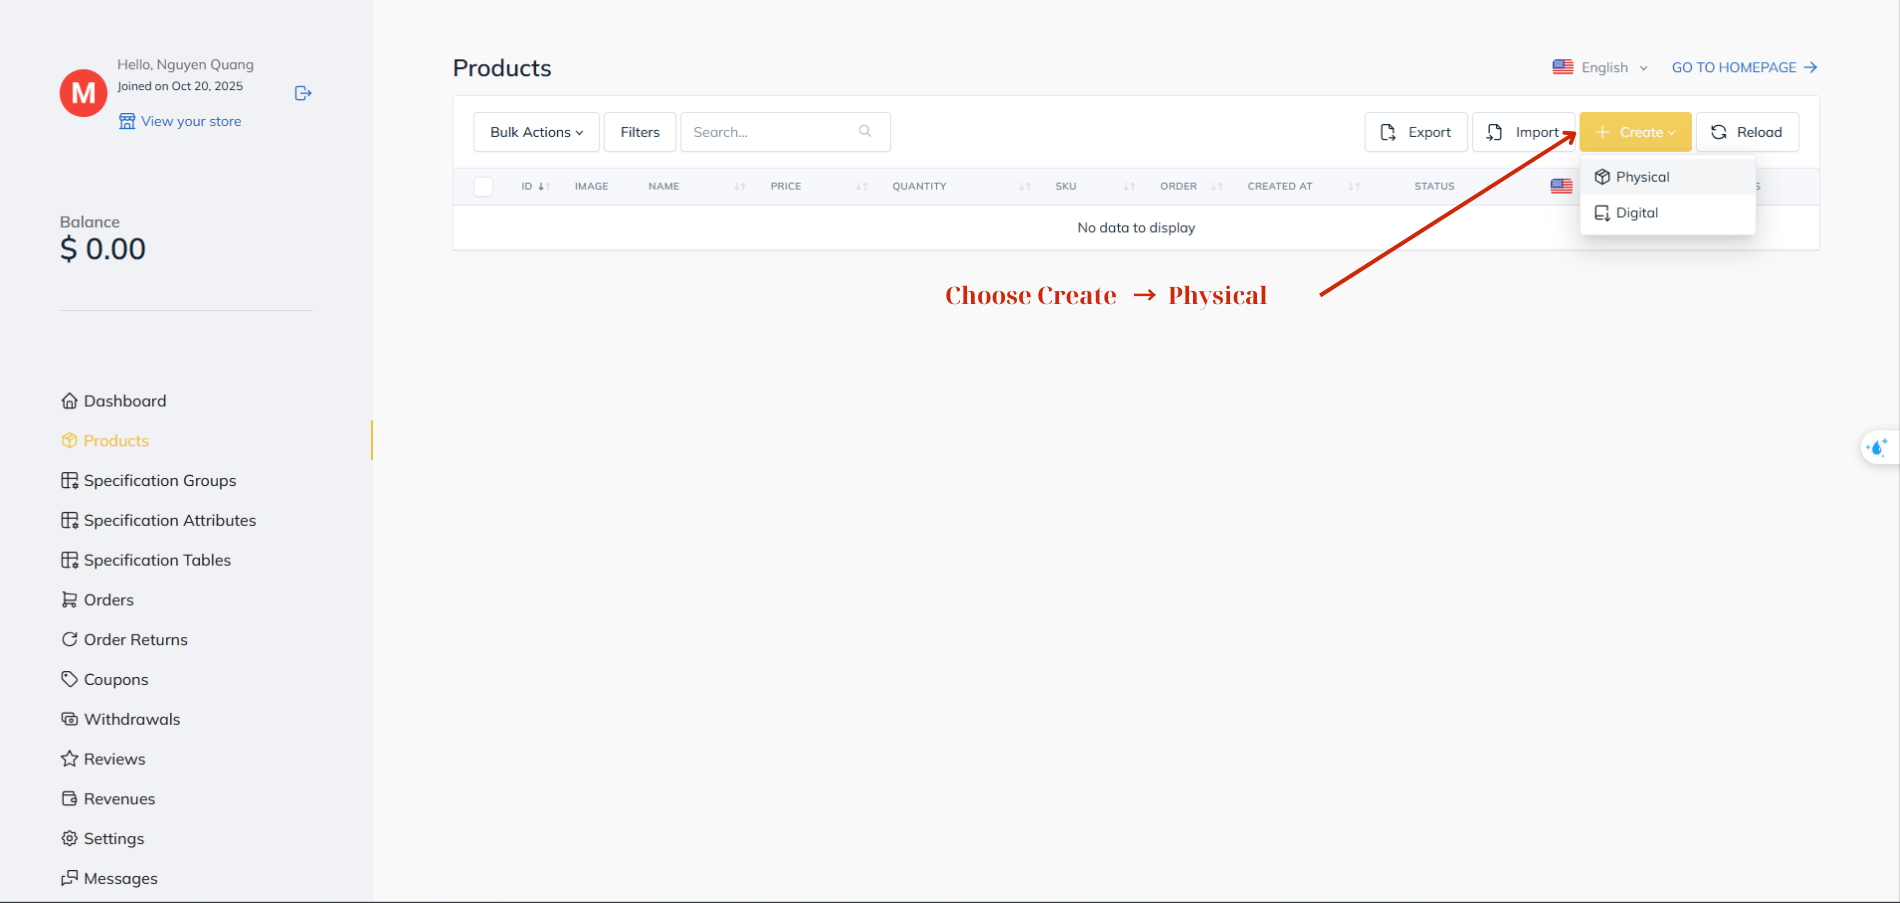
Figure 9: Enter Product Section
A new physical product page will be loaded, this page allows vendors to add and configure new products in their store.
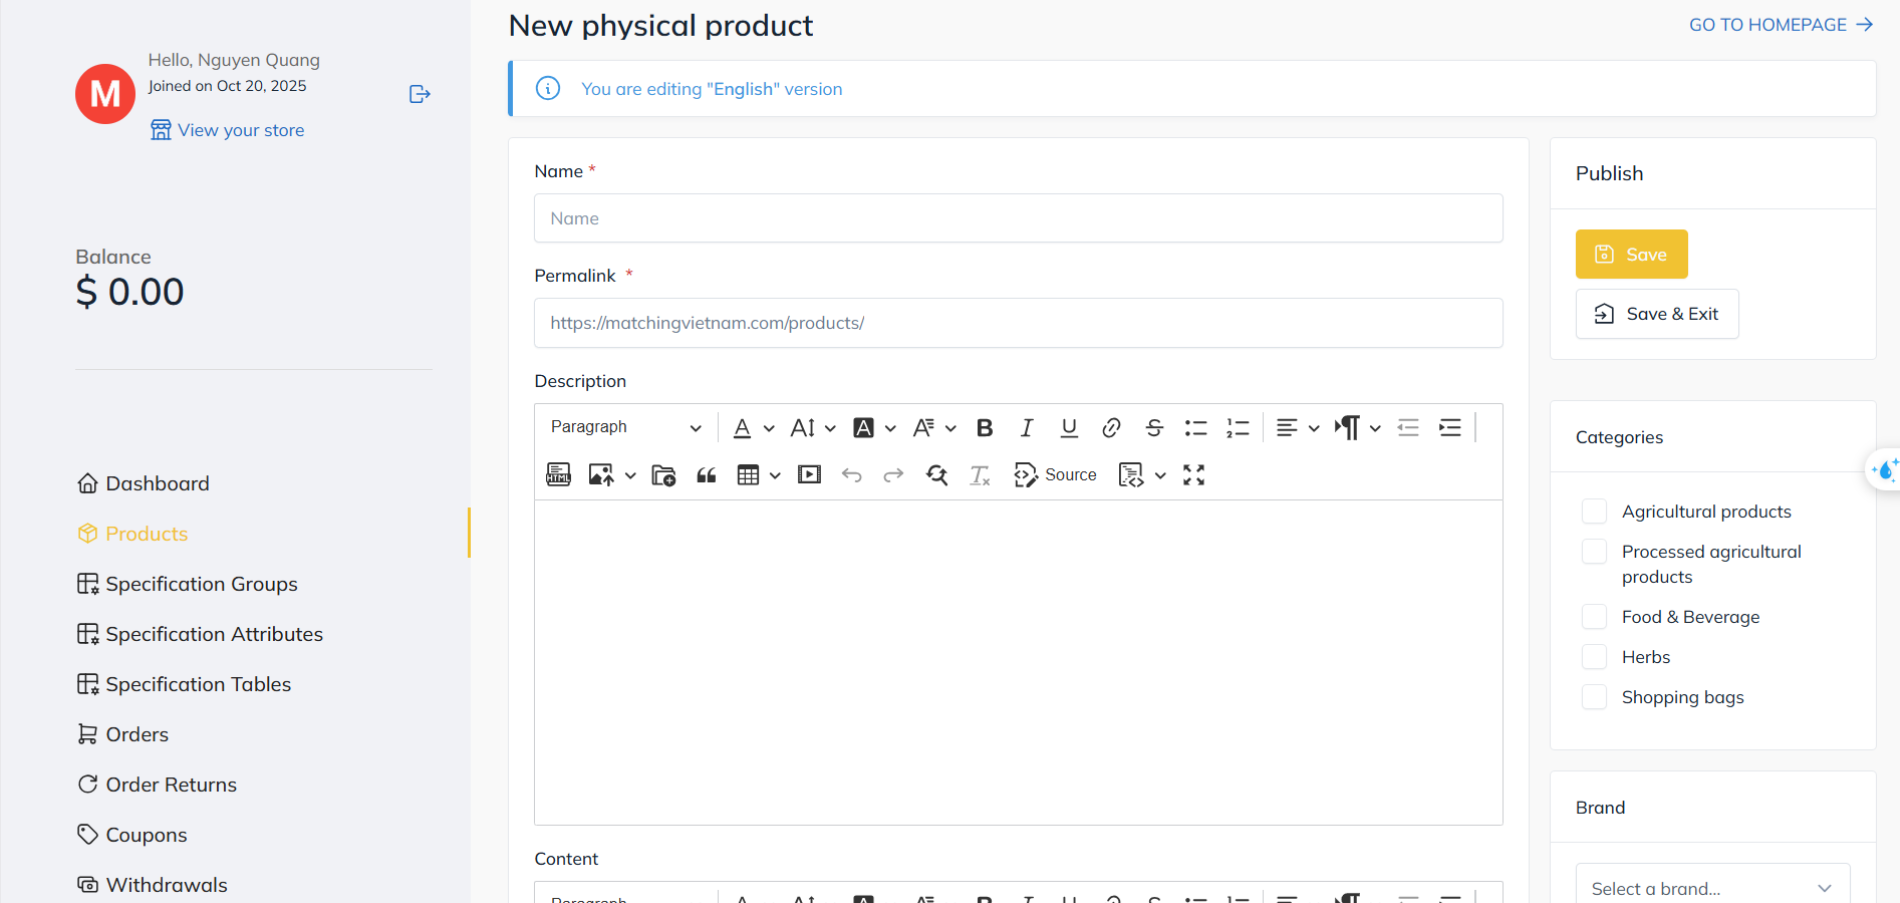
Figure 10: Product Configuration Interface
Vendors can enter the product’s basic information, including:
Name: The product title displayed on the website.
Permalink: The product’s URL, which is automatically generated but can be customized.
Description: A short introduction or overview of the product, highlighting key features and selling points.
Content: A detailed section for full product descriptions, specifications, or marketing content.
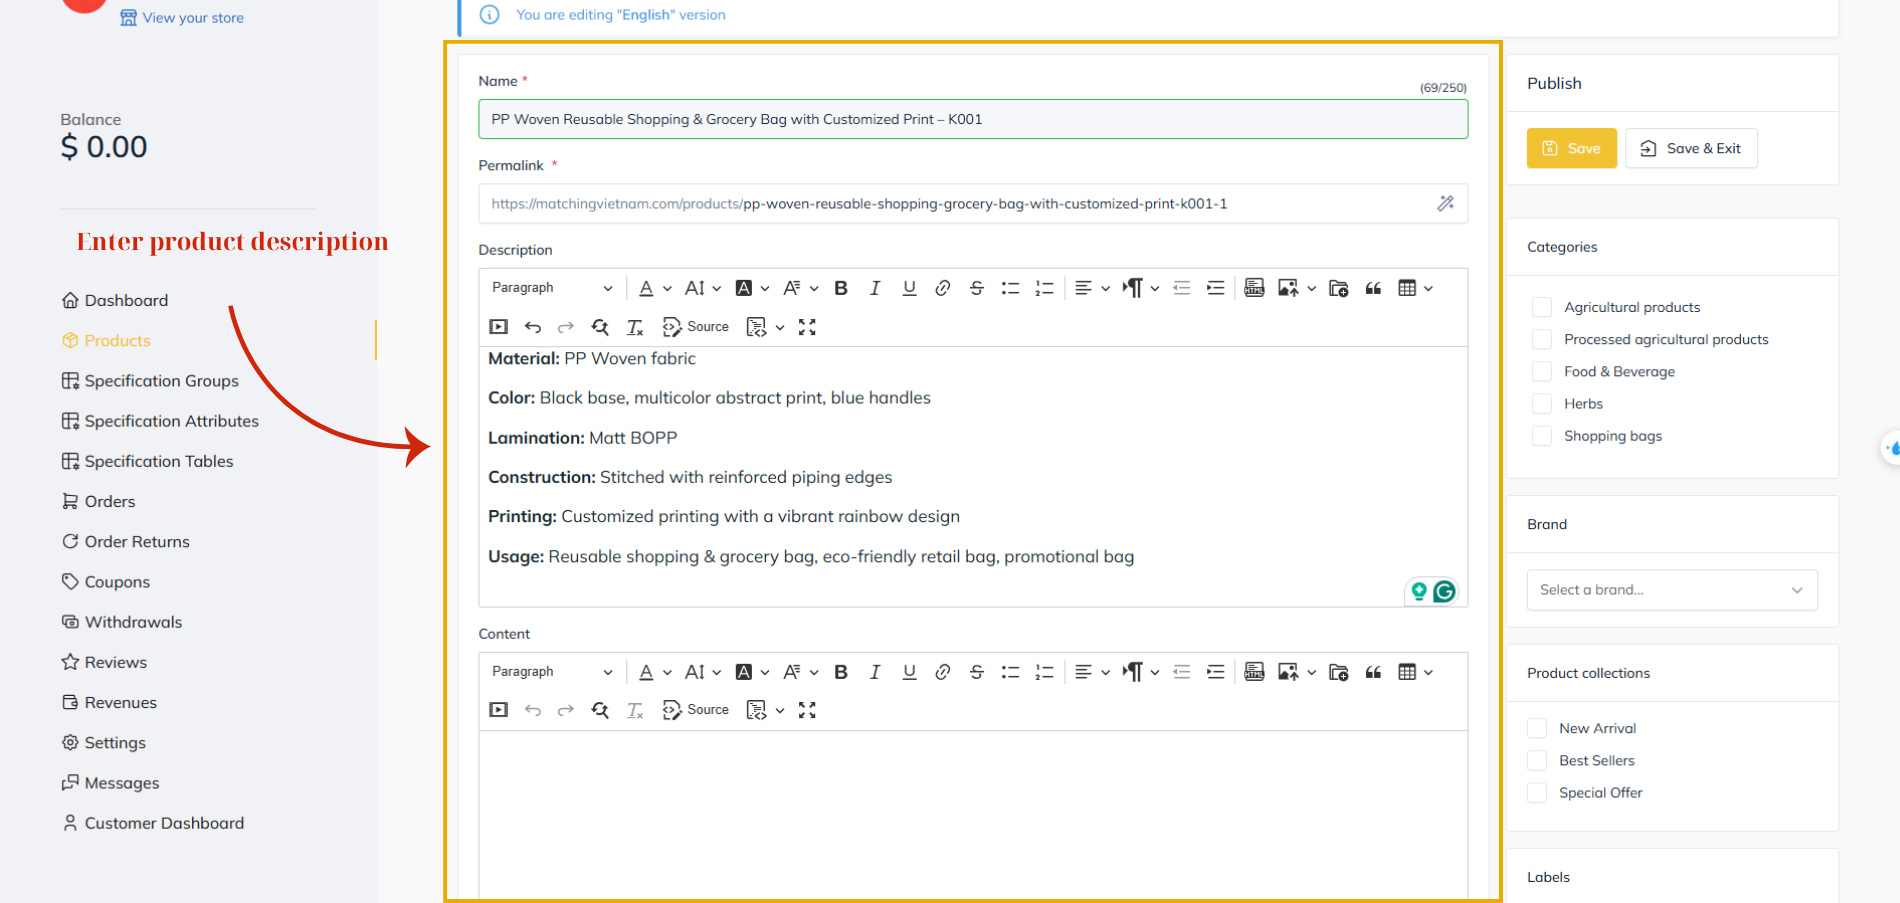
Figure 11: Edit Product Description (1)
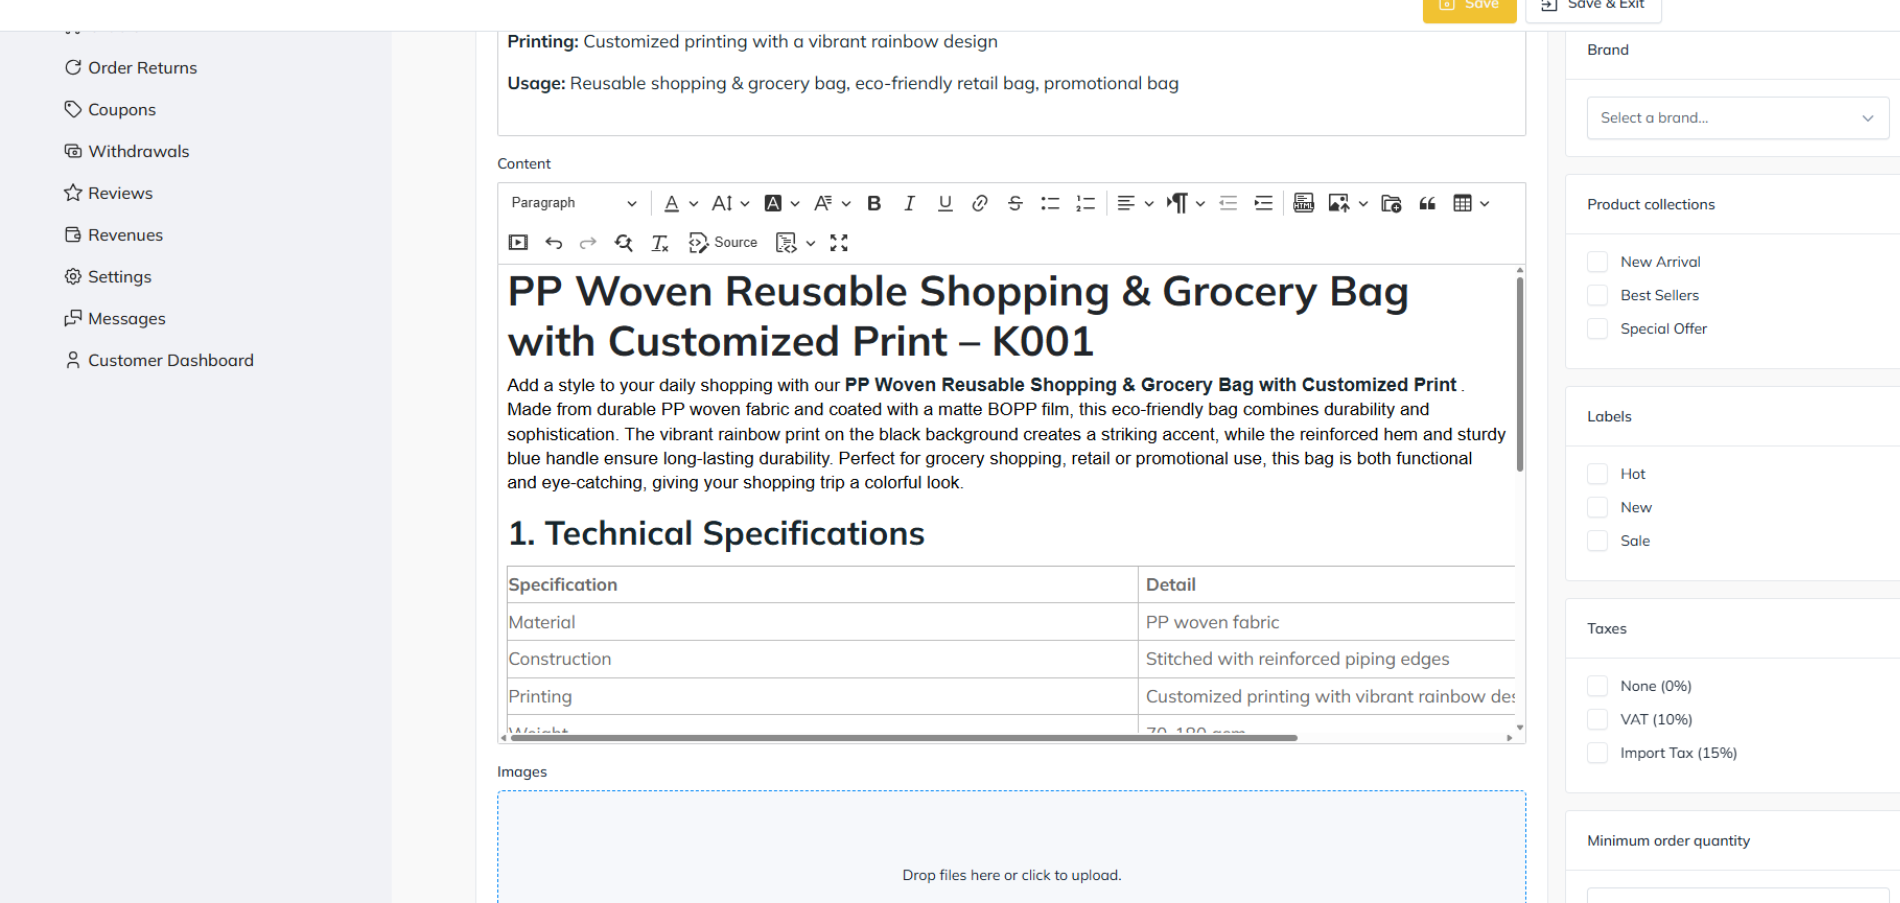
Figure 12: Edit Product Description (2)
Step 5: Upload Product Images
After completing the product name and description fields, you can upload your product image or video before publishing your product.
Scroll down to the Images section and upload high-quality photos of your product.
You can either drag and drop files directly into the upload area or click to browse your computer.
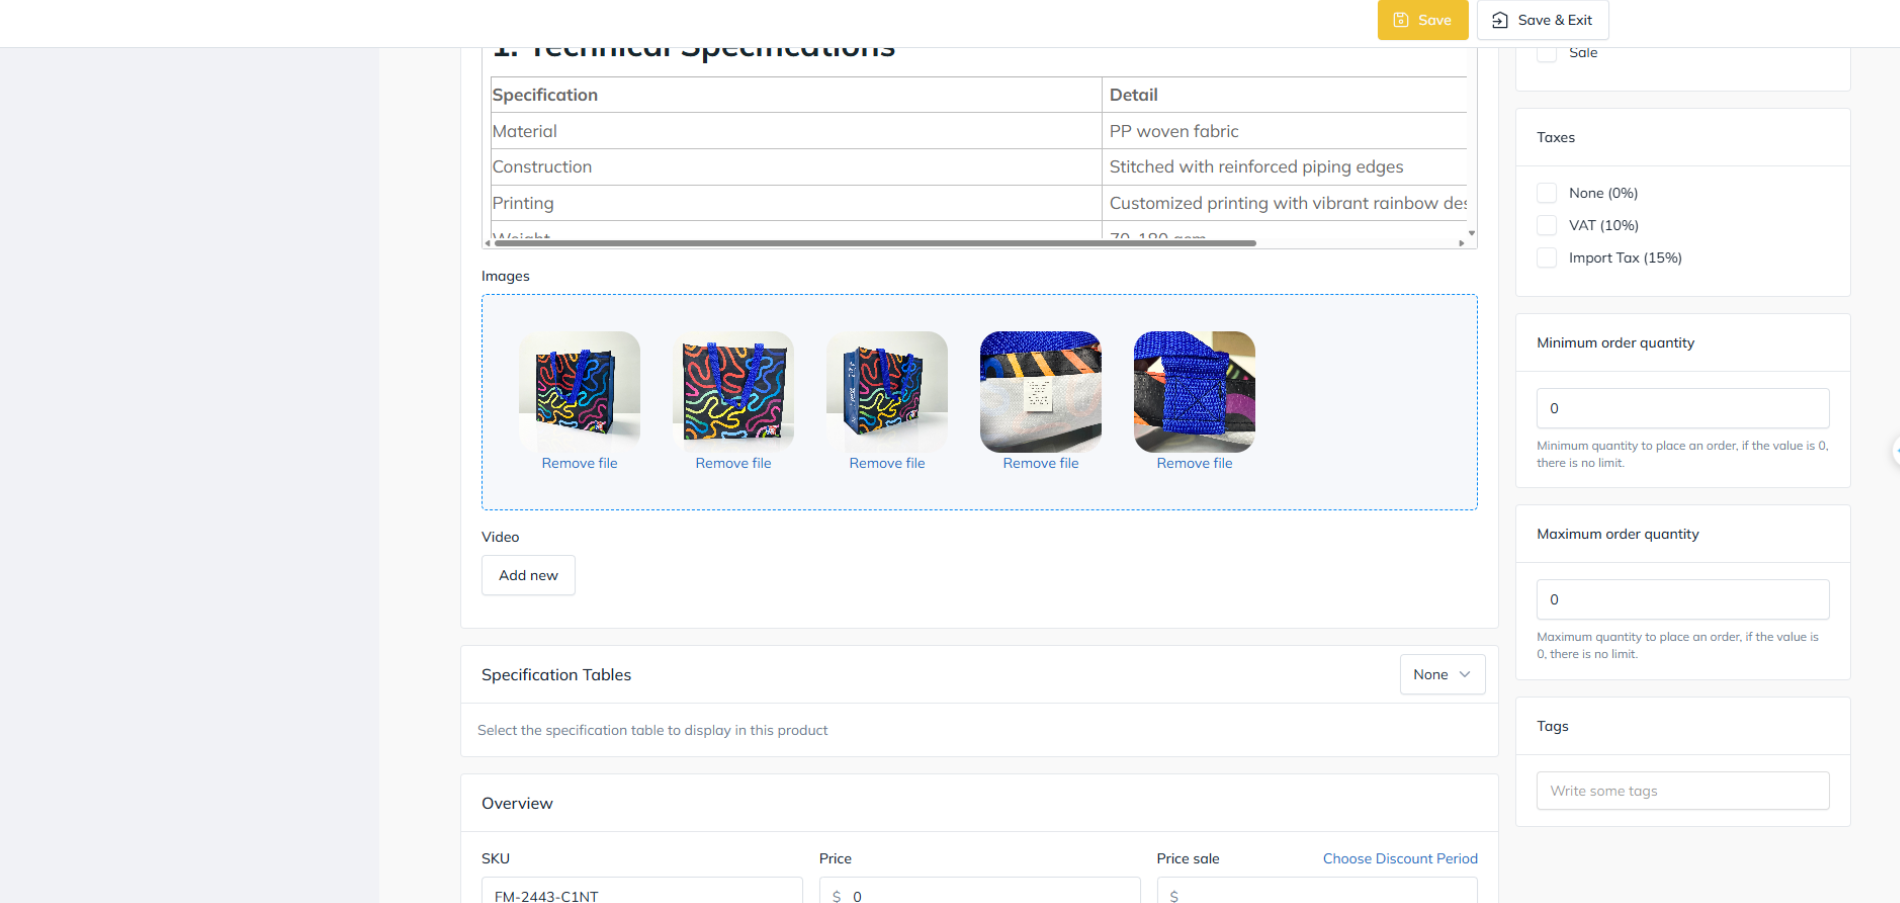
Figure 13: Edit Product Description (3)
It is recommended to include multiple images showing different angles, packaging, and product details to enhance buyer trust.
Step 6: Enter Product Details and Configure Inventory
In this section, vendors can define pricing, inventory, and shipping information for their product.
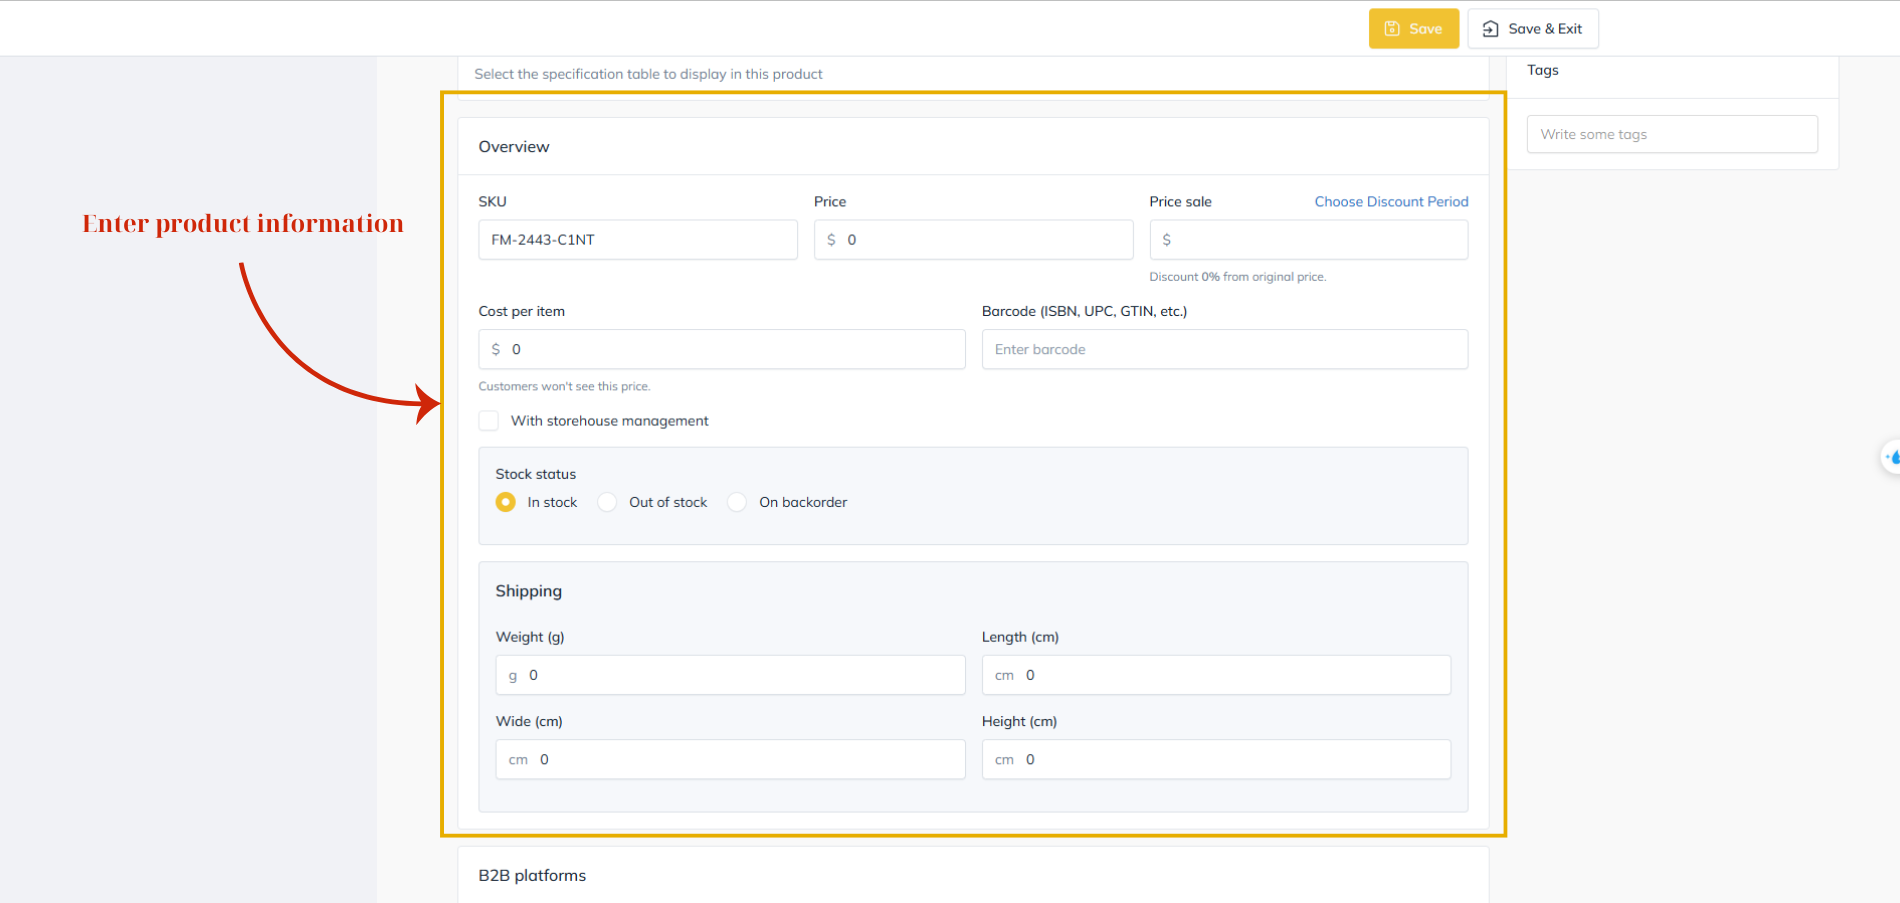
Figure 14: Enter Product Details and Configure Inventory
Fill in the following fields:
SKU (Stock Keeping Unit): Unique product identifier for inventory management.
Price / Sale Price: Enter the product’s base selling price and, if applicable, a discounted price.
Cost per Item: Internal cost (not visible to customers).
Stock Status: Choose between In stock, Out of stock, or On backorder.
Shipping Information: Enter product weight and dimensions (length, width, height) for accurate delivery cost calculation.
Step 7: Add Additional Product Information
Continue scrolling to enter advanced details that help optimize product visibility and improve user experience:
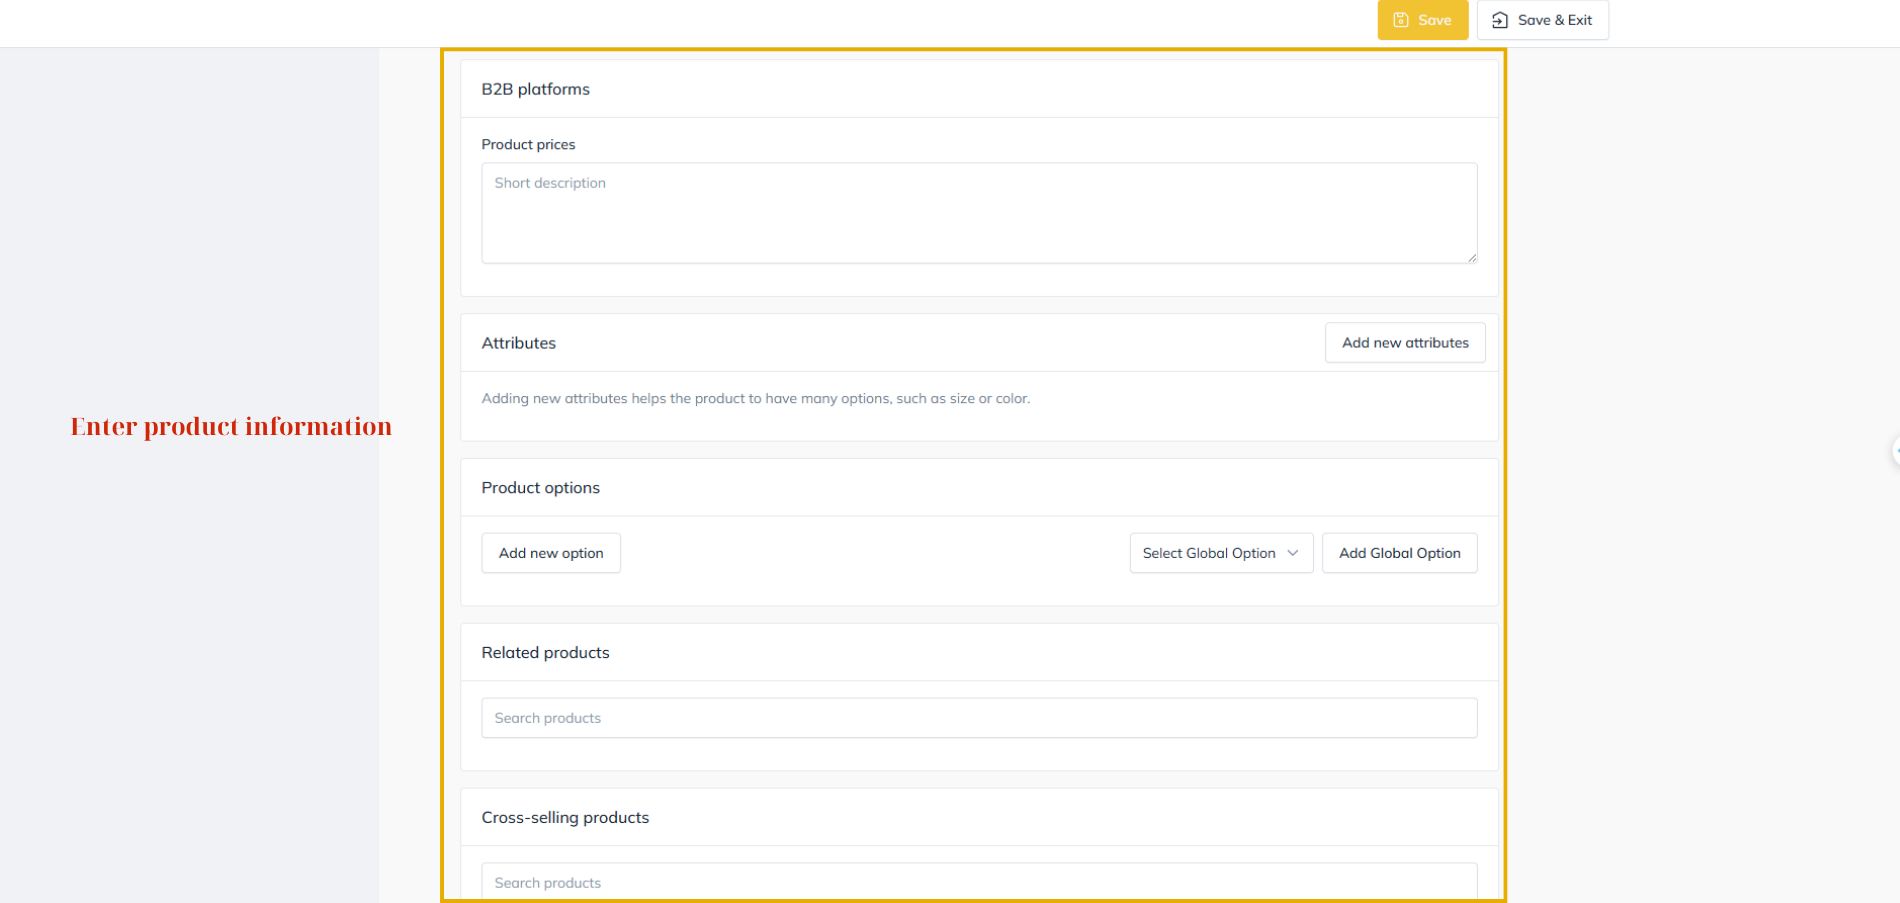
Figure 15: Add Additional Product Information
B2B Platforms: Provide short pricing notes or wholesale conditions (if applicable).
Attributes: Add key product attributes, such as size, color, or material type.
Product Options: Define variant options (e.g., size selection, packaging types).
Related Products: Suggest similar or complementary items to enhance cross-selling opportunities.
Cross-Selling Products: Add products often bought together to increase potential sales.
Step 8: Add Product FAQs
Use the Product FAQs section to create a list of common questions and answers regarding the product. This feature helps reduce repetitive customer inquiries and provides clear guidance for buyers.
Simply enter each Question and Answer, then click Add new to include more items as needed.
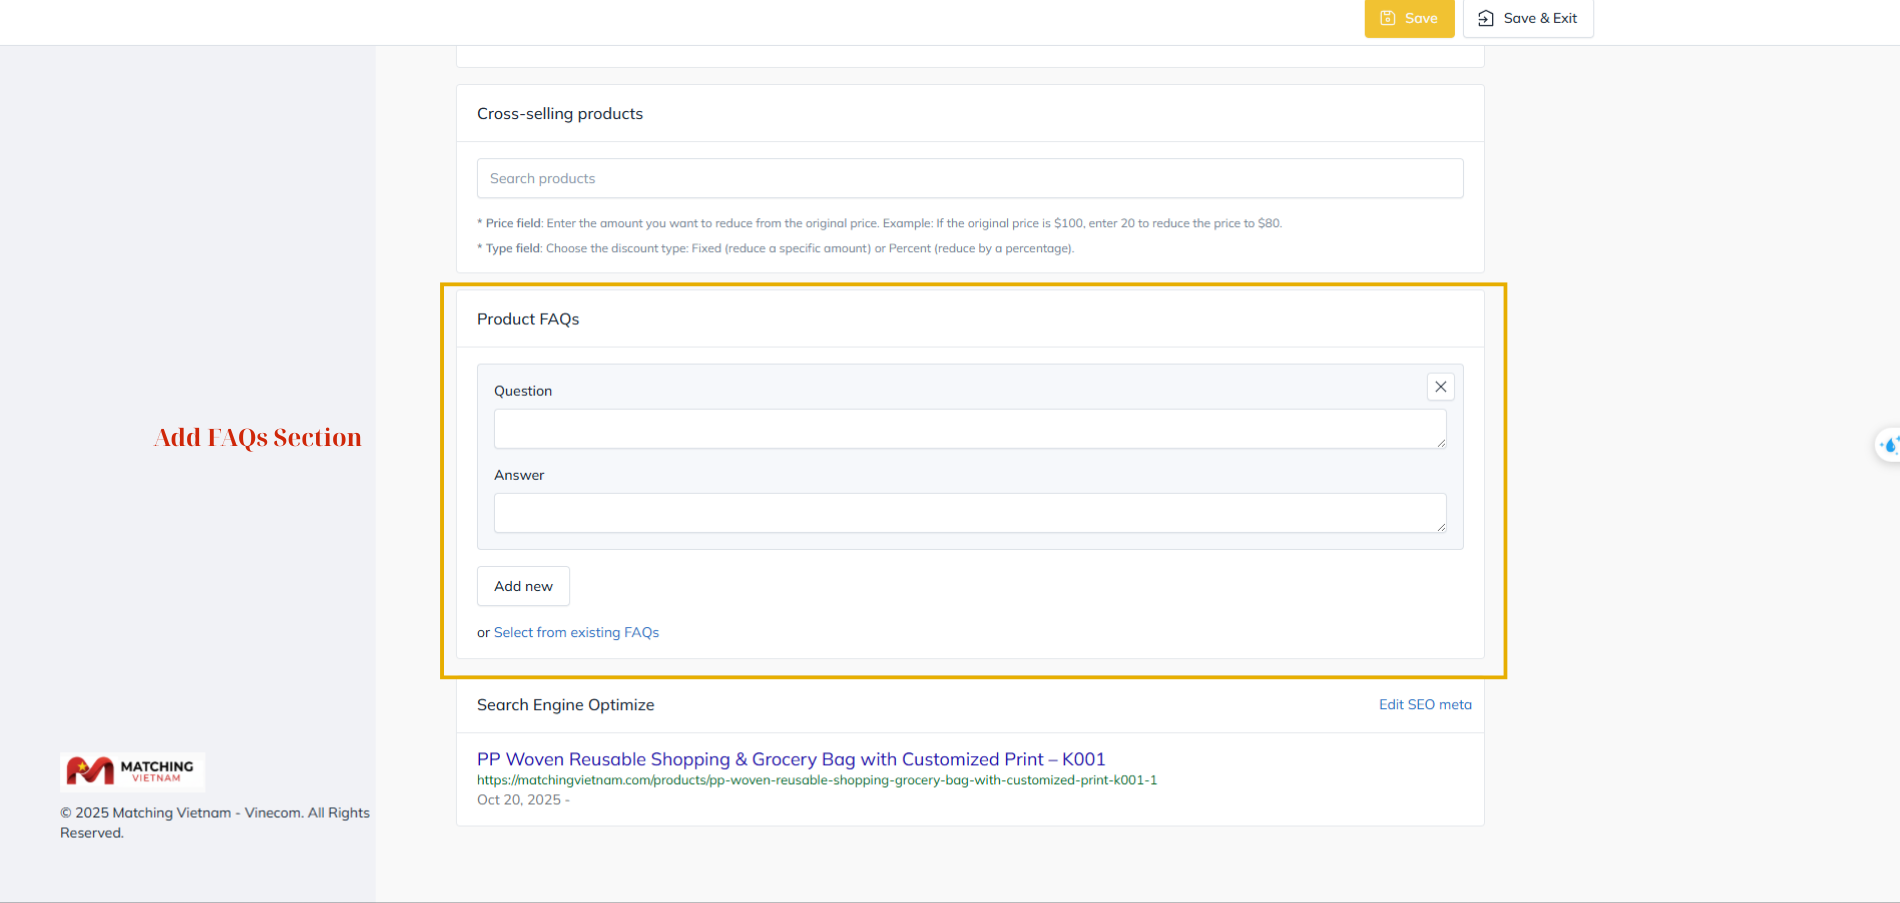
Figure 16: Add Product FAQs
Step 9: Configure SEO Metadata
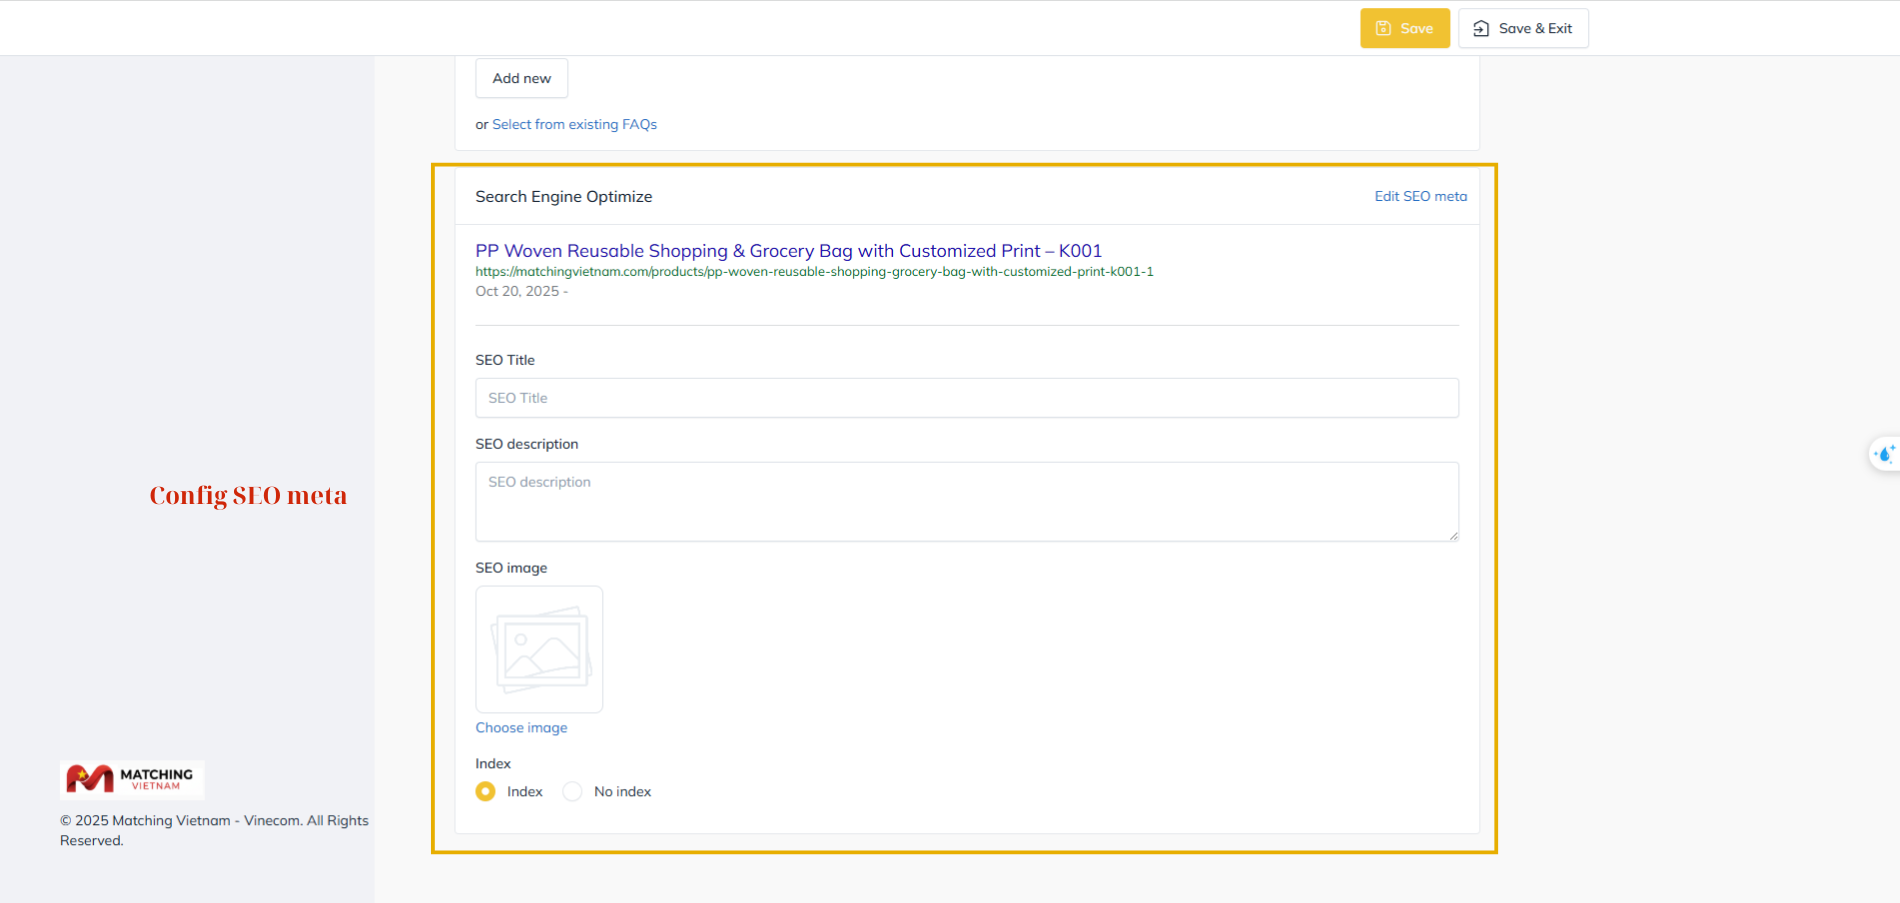
Figure 17: Configure SEO Metadata
To improve the product’s search visibility on Matching Vietnam and external search engines, configure the SEO settings at the bottom of the page:
SEO Title: Enter a concise and descriptive product title for search results.
SEO Description: Write a summary highlighting the product’s main features and value.
SEO Image: Upload an optimized image to display on search engine previews.
Index Setting: Choose Index to allow search engines to list your product page.
Step 10: Configure product classification and limits

Figure 18: Configure product classification and limits
On the right-hand side of the product creation page, you can configure all essential product classification and ordering details before submission:
Categories: Select the most suitable category for your product from the available list, such as Agricultural Products, Processed Agricultural Products, Food & Beverage, Herbs, or Shopping Bags. Correct categorization helps customers find your product easily in relevant searches.
Brand: Choose an existing brand from the dropdown menu, or leave it blank if your product is not associated with a brand.
Product Collections: Assign your product to special collections like New Arrival, Best Sellers, or Special Offer to increase its visibility and engagement.
Labels: Apply visual labels such as Hot, New, or Sale to highlight promotional or trending products on your store page.
Taxes: Specify the appropriate tax rate applicable to your product — None (0%), VAT (10%), or Import Tax (15%).
Minimum Order Quantity: Enter the smallest quantity that a customer can purchase. If set to “0,” there will be no minimum limit.
Maximum Order Quantity: Define the largest quantity that can be ordered per transaction. If set to “0,” there will be no restriction.
Tags: Add relevant keywords or phrases related to your product to improve its visibility in the website’s internal search results.
Step 11: Save and Submit the Product for Review
Once all product details have been entered and verified, proceed to the Publish section located on the right side of the page to save and submit your product for approval.
Save: Click Save to store your product and remain on the product creation page. This allows you to continue editing or reviewing your product information without leaving the current interface.
Save & Exit: Click Save & Exit to save your product and exit the product creation interface. You will be redirected to the Product List page in your Vendor Dashboard.
Both actions will place your product in “Pending Approval” status.
Your listing will only become visible on the store after it has been reviewed and approved by the platform administrator.
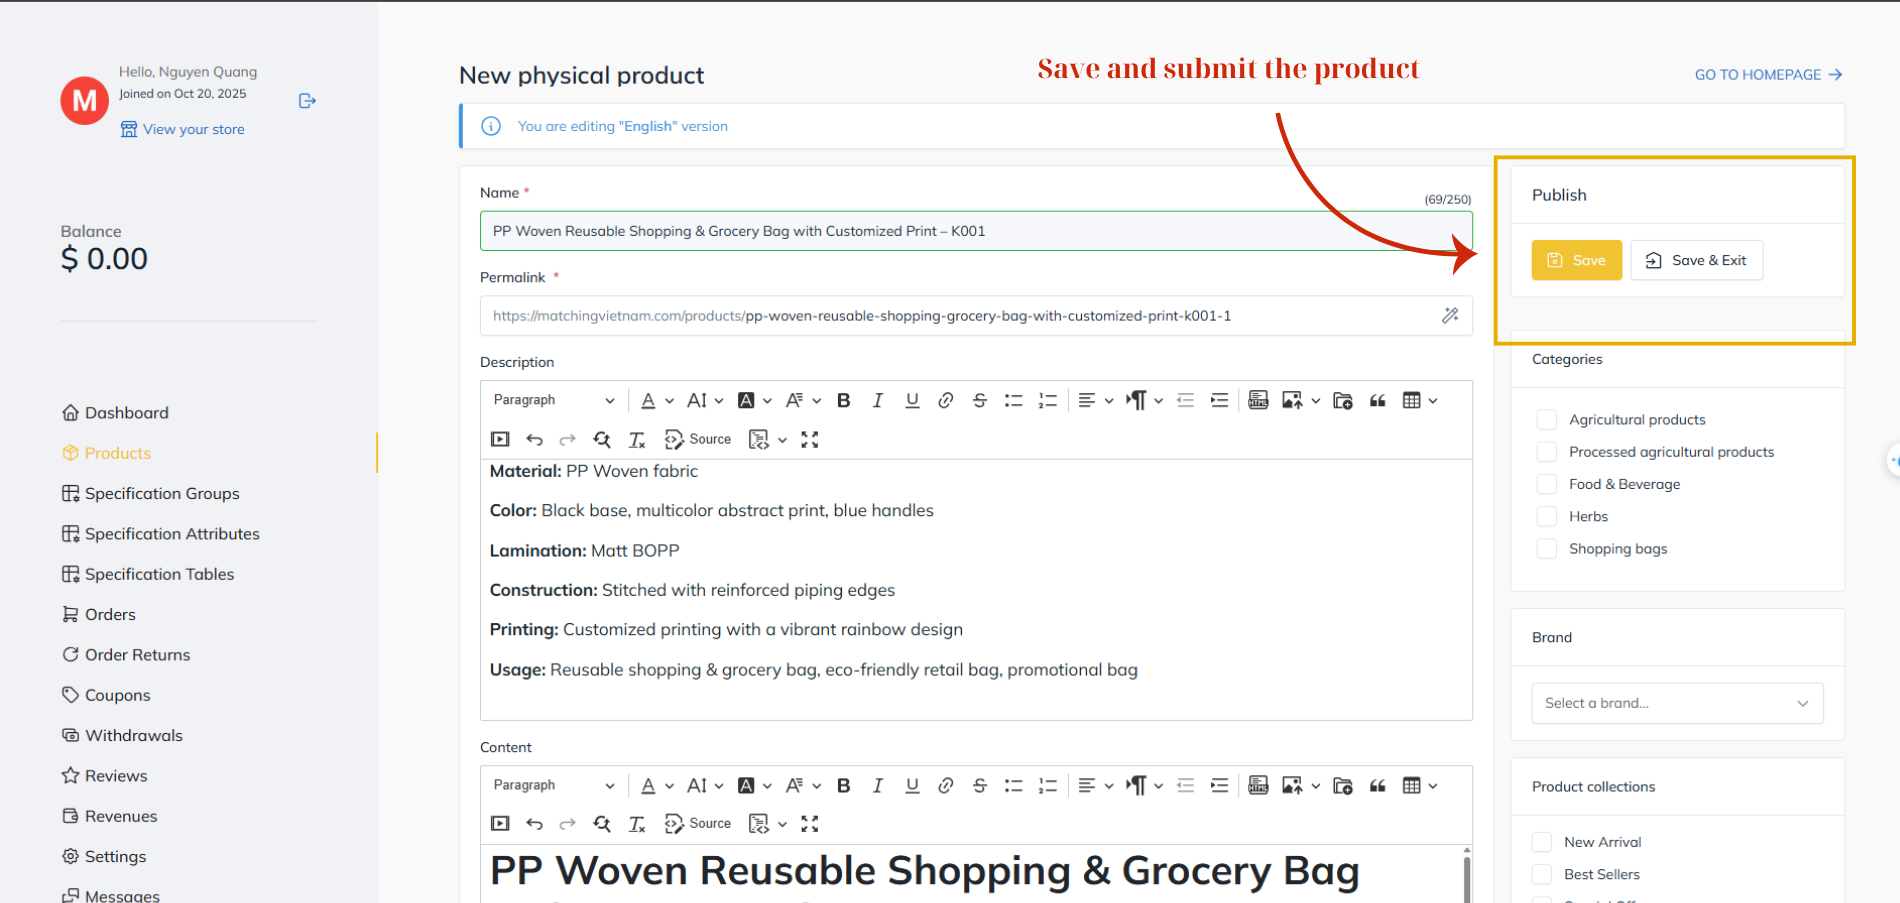
Figure 19: Save and Submit the Product for Review
After Product Approval
Once your product has been reviewed and approved by the Matching Vietnam administration team, it will officially appear on your store page and become visible to all customers on the platform.
The approved product page displays complete information, including product images, specifications, price, and purchase options such as Add to Cart and Buy Now. Buyers can view details, compare items, and place orders directly through your store.
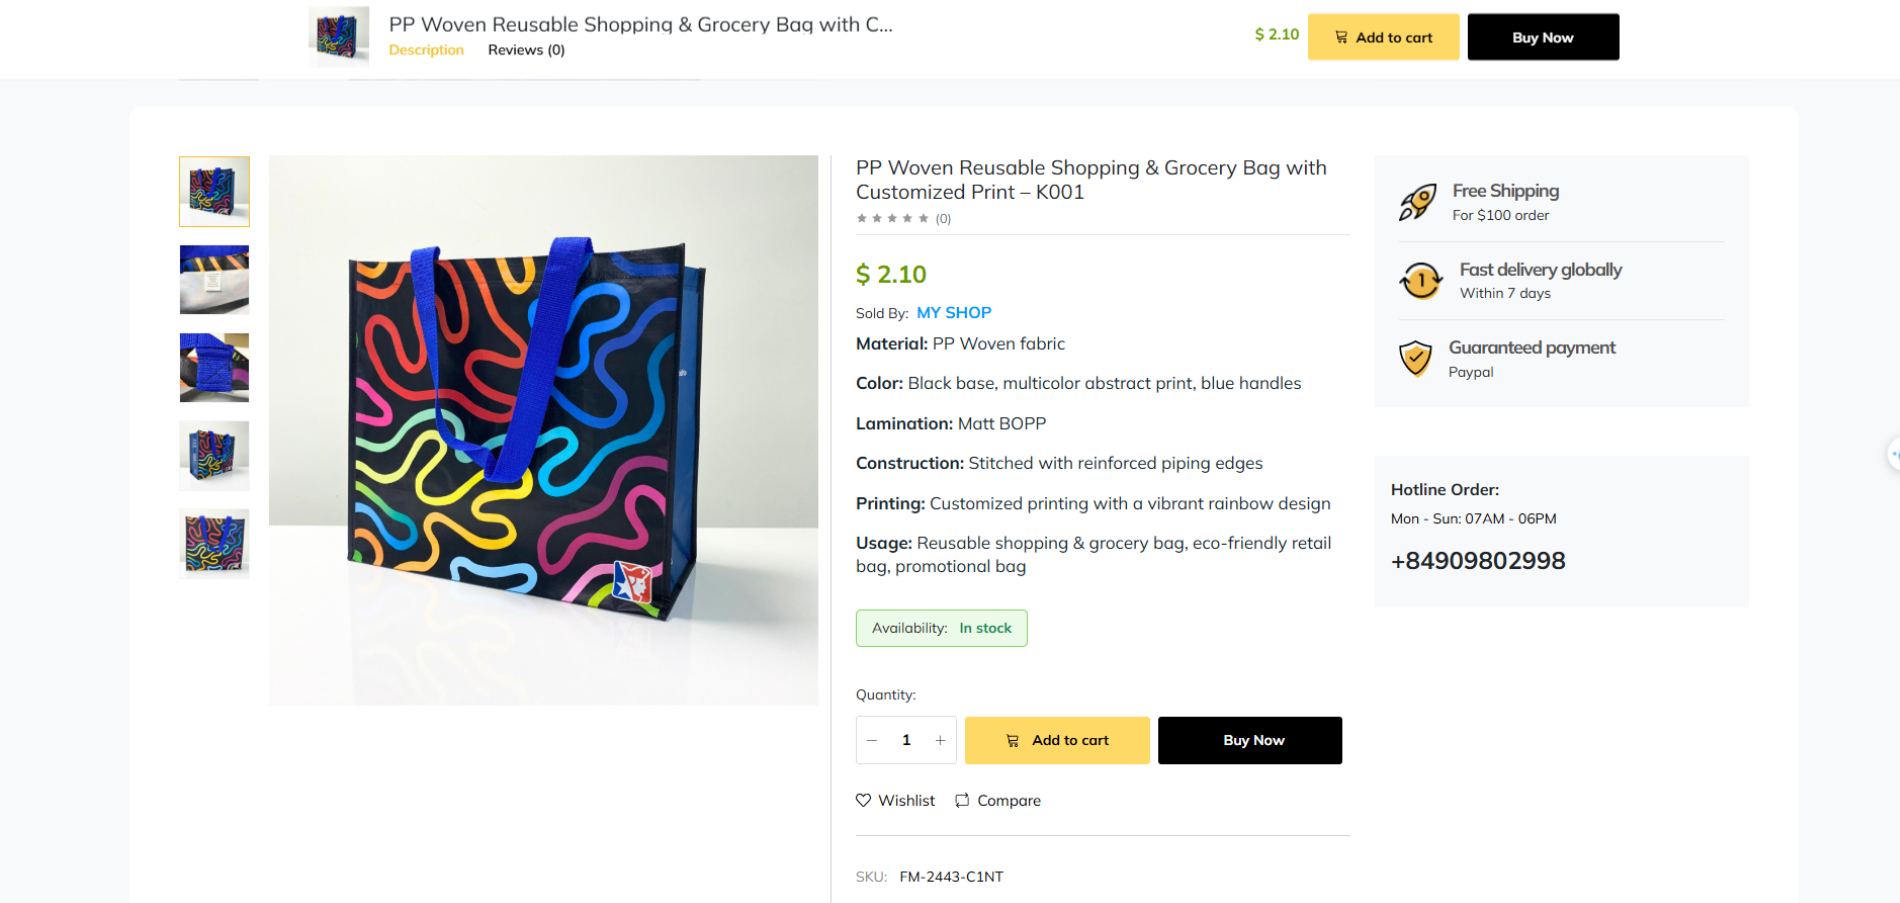
Figure 20: Published Product Interface
At this stage, your product is live and ready to reach global customers, allowing you to start receiving inquiries and managing transactions from your Vendor Dashboard.